Install MySQL on Ubuntu 16.04. How to configure MySQL On Ubuntu 16.04. Terminal commands to install MySQL Server on Ubuntu 16.04.
Please note that not all platforms are equally suitable for running MySQL, and that not all platforms on which MySQL is known to run are officially supported by Oracle Corporation. For information about those platforms that are officially supported, see http://www.mysql.com/support/supportedplatforms/database.html on the MySQL Web site.
Install MySQL Server on Ubuntu

Step 1. Run the following command to install mysql-server package on Ubuntu 16.04 Systems:
sudo apt-get install mysql-server
While installing, you will be asked to select password for the account.
Step 2. Once MySQL is installed, run the following command to install mysql_secure_installation:
mysql_secure_installation
Verify MySQL Installation
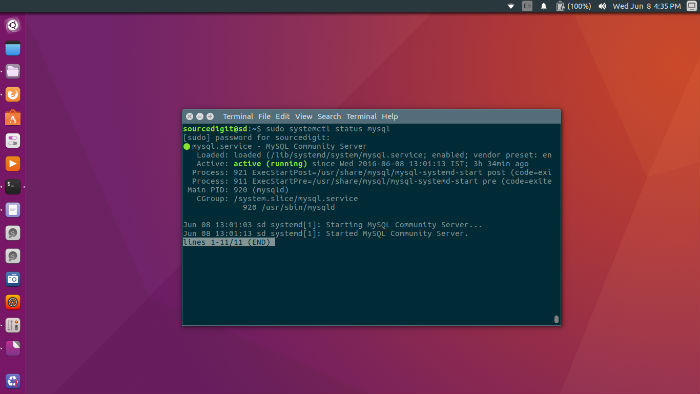
Once MySQL is installed, you can verify the MySQL status using command:
On Ubuntu 16.04, Ubuntu 15.10, Ubuntu 15.04:
sudo systemctl status mysql
On Ubuntu 14.10 and previous versions of Ubuntu:
sudo service mysql status
Create a MySQL Database
Step 1. To create MySQL database, log into MySQL and follow the steps given below. First, run the following command to login to MySQL:
mysql -u root -p
When you are logged in, you’ll see MySQL prompt.
Step 2. Now it’s time to create MySQL database and a user with appropriate permissions for the same. In this example, the database is called mydatabase, the user myuser, and password password:
CREATE DATABASE mydatabase;

GRANT ALL ON mydatabase.* TO 'myuser' IDENTIFIED BY 'password';
Step 3. Once done, run the command to exit MySQL:
quit